How to register for GPPA Exam?
To register for the GPPAE exam on the official website, follow these steps:
Registration
Go to the Website: Visit www.gppae.com.
Log In or Create an Account: If you already have an account, log in with your credentials. If not, sign up by clicking on the "Login".
The Click on "Register here":
Once you’ve completed the registration steps, you’ll be directed to a confirmation page prompting you to verify your email address. Here’s how to proceed:
Check Your Email Inbox: Open the inbox of the email address you used during registration.
Locate the Verification Email: Look for an email from GPPAE with the subject line “Email Verification.”
Click the Verification Link: Open the email and click on the verification link provided. This will confirm your email address.
Proceed to the Verification Page: After clicking the verification link, you’ll be redirected to a confirmation page on the GPPAE website, indicating that your email address has been successfully verified.
Log In to Your Account: You can now log in to your GPPAE account to access your dashboard and proceed with the next steps.
Edit Basic Details
- Access Basic Details: In the red sidebar, click on the menu item labeled Basic Details, represented by an icon of a person.
- Edit Basic Details: At the top of the main content area, find the title Candidate Profile followed by a section labeled Basic Details with a red-marked edit icon. Click this icon to make changes.
- Update Profile Picture: In the left sidebar, find the circular placeholder for your profile picture with a pencil icon overlay. Click the pencil icon to upload or change your profile picture.
Steps to Complete the Candidate Profile
Fill in Personal Information:
- About Me: In the "About Me" section, type a brief description about yourself in the text box.
- First Name: Enter "First" in the first name field.
- Middle Name: Enter your middle name, if applicable.
- Last Name: Enter "Last" in the last name field.
- Gender: Use the dropdown menu to select your gender.
- Date of Birth: Enter your date of birth in the specified format.
- Save Changes: At the bottom of the form, there are two buttons: "Cancel" and "Submit". Click "Submit" to save your changes and update your profile.
Steps to Update Contact Details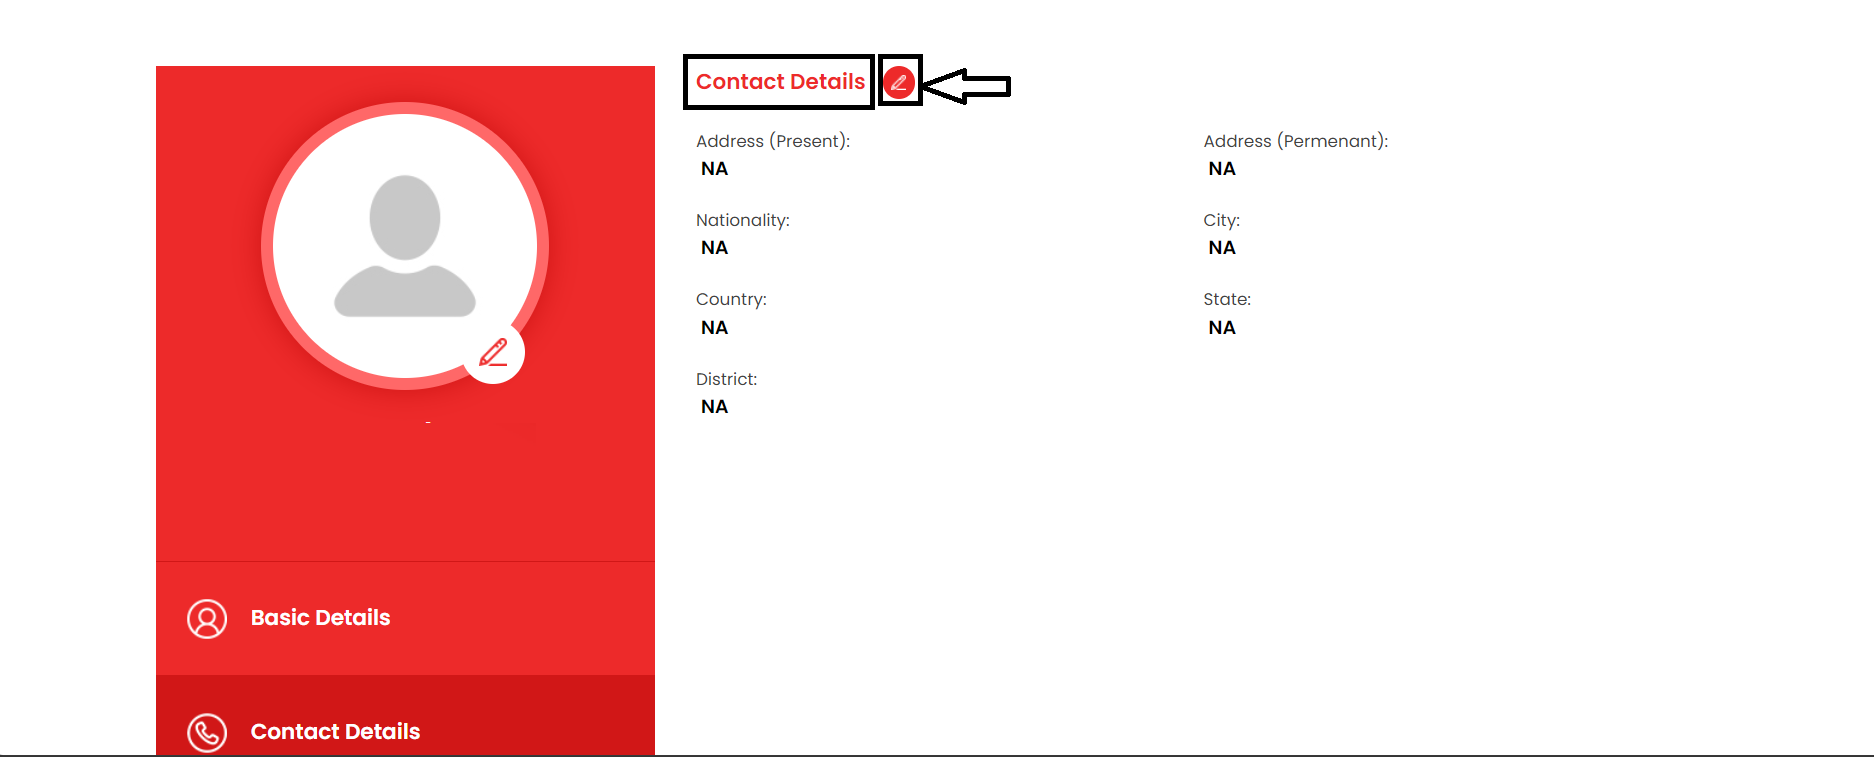
In the sidebar, click on the menu item labeled "Contact Details" to access the relevant section.
- Edit Contact Details: Click the red-marked edit icon next to the "Contact Details" header to enable editing.
- Fill in Personal Information:
- Address (Present): Enter your current address in the provided field.
- Address (Permanent): Enter your permanent address if it differs from your present address.
- Nationality: Select your nationality from the dropdown menu.
- City: Enter the city where you reside.
- Country: Select your country from the dropdown menu.
- State: Enter the state you live in.
- District: Enter your district.
- Save Contact Details: Once you've entered all the necessary information, click the "Submit" button at the bottom of the form to save your updated contact details.
Steps to Add and Edit Known Languages
- Navigate to Languages Section:
- In the sidebar, click on the menu item labeled "Languages" to access the relevant section.
- Add a New Language: Click the red marked plus icon to open a new entry field for adding a language
- Select Language: From the dropdown menu, choose the language you want to add.
- Proficiency Level: Specify your proficiency levels by checking the boxes for "Speak," "Read," and "Write."
- Edit Existing Languages: If there are existing languages listed, click the edit icon (usually a pencil) next to each language to make changes.
- Update Language Details: Modify the language and proficiency levels as needed.
- Save Changes: Once you've added or edited the languages, click the "Submit" button at the bottom of the form to save your updates.
Steps to Add and Edit Educational Details
Navigate to Educational Details Section: Look at the sidebar on your left. Find the menu item labeled "Educational Details" and click on it. This will open the section where you can edit your educational information.
- Edit 10th Grade Details: To start editing, find the "10th Grade" section. Click on the red-marked edit icon next to it.
- College/School Name: You will see a field labeled "College/School Name." Click on it and enter the name of your school.
- Board/University: Next, find the field labeled "Board/University." Click on it and type in the name of your board or university.
- Year of Passing: Locate the field for "Year of Passing." Click on it and enter the year you completed your 10th grade.
- Mark/Grade: Finally, find the field labeled "Mark/Grade." Click on it and input your marks or grade.
After entering all the details, make sure to click the "Save" button to save your changes.
Follow these same steps for editing details of your 12th Grade, Diploma, Degree, Masters, MPhil, and PhD. Simply navigate to the corresponding section, click the edit icon, and fill in the relevant fields.
Steps to Add and Edit Work Experience
Navigate to Work Experience Section: In the sidebar, find and click on the menu item labeled "Work Experience" to access this section.
- Add a New Job: Click the red-marked plus icon to open a new entry field for adding a job.
- Company Name / Hospital: Enter the name of the company or hospital where you worked.
- Position: Enter your job title.
- Department: Specify the department you worked in.
- Roles & Responsibilities: Provide a detailed description of your roles and responsibilities.
- Currently Working?: Check the box if you are currently working in this position.
- Skills Learned: Write about the skills you gained while working in this position.
- Start Date: Enter the start date of your employment.
- Reference: Add a reference contact from this job.
- Reference Contact Number: Provide the contact number of your reference.
- Reference Position: Specify the position of your reference.
Edit Existing Job Details: If you have existing job entries, click the edit icon (usually a pencil) next to each job to make changes.
Update any details as needed and ensure they are accurate.
Save Work Experience Details: Once you've entered or edited the work experience details, click the "Submit" button at the bottom of the form to save your updates.
You can follow these steps for each of your job experiences, ensuring all relevant details are accurately documented.
Steps to Add and Edit Achievements
Navigate to Achievements Section: In the sidebar, click on the menu item labeled "Achievements" to access this section.
Add a New Achievement:
- Name: Click on the field labeled "Name" and enter the name of your achievement.
- Achievements: Click on the field labeled "Achievements" and provide a detailed description of your achievement.
- Save & Add More: If you have multiple achievements to add, click the "Save & Add More" button. This will save the current entry and allow you to add another.
Edit Existing Achievements:
- If you have existing achievements listed, click the edit icon (usually a pencil) next to each achievement to make changes.
Update the name and details of the achievement as needed.
Save and Submit:
Once you've entered or edited the achievements, click the "Submit" button at the bottom of the form to save your updates.
Follow these steps for each achievement you want to document, ensuring all relevant details are accurately recorded.
Steps to Upload Documents
- Navigate to Documents Section:
- In the sidebar, find the menu item labeled "Documents" and click on it to access this section.
- Choose File to Upload:
- Click the "Choose File" button. This will open a file selection window where you can choose the document you wish to upload from your device.
- Save Document Details: Once you have selected your file, click the "Submit" button at the bottom of the form to save your upload.
Steps to Join the Exam
Document Upload Complete: After you have successfully uploaded your document, you'll see a confirmation message indicating that your document has been uploaded.
Click on Join the Exam: Look for a button labeled "Join the Exam." Click on this button to proceed to the exam registration or access page.
Steps to Upload Passport and Join the Exam
Upload Passport Details:
After clicking "Join the Exam," you will be redirected to the "Passport Upload" page.
Upload Passport Front: Click on the "Choose file" button next to "Passport front*" to select the file from your device. Then, click the "UPLOAD" button.
Upload Passport Back: Click on the "Choose file" button next to "Passport back*" to select the file from your device. Then, click the "UPLOAD" button.
Once both the front and back of your passport are uploaded, click the red "Submit" button to proceed.
Proceed to Payment:
After uploading your passport, you'll be redirected to the payment page.
Steps to Make the Payment
After clicking "Join" and confirming your intention to join the exam, you will upload passport copies and then be redirected to the payment page.
- Select Payment Method: On the payment page, you will see various payment options. Choose your preferred payment method (e.g., credit card, debit card, net banking, UPI, etc.).
- Enter Payment Details: Fill in the necessary payment details such as card number, expiry date, CVV, or UPI ID, depending on the selected payment method.
- Confirm Payment: Double check the payment details to ensure they are correct. Click the "Pay Now" or "Proceed to Payment" button to initiate the transaction.
- Complete Transaction: Follow any additional steps required by your payment provider (e.g., entering an OTP sent to your phone).
- Once the transaction is successful, you will see a confirmation message and receive a receipt or transaction ID.
- Save Payment Confirmation: It's a good idea to save or screenshot the payment confirmation for your records.
Related Articles
What is GPPAE - Global Professional Proficiency Assessment Exam?
The GPPAE is a comprehensive evaluation designed to assess the professional proficiency of individuals across diverse global industries. Its primary objective is to establish a standardized measure of professional competencies, ensuring that ...GPPA Exam Writing Section Overview
The writing section of the GPPAE evaluates a range of writing tasks that are essential for demonstrating professional proficiency. Key components include: Components: Letter Writing: Candidates will compose both formal and informal letters based on ...GPPAE Online Exam Guide: Requirements & Instructions
Introduction Preparing for the GPPAE online exam? This guide provides a comprehensive overview of the GPPAE online exam requirements, including technical setup, submission guidelines, and best practices to ensure a smooth examination process. Online ...GPPAE Syllabus – Global Professional Proficiency Assessment Exam (Nursing)
Objective The GPPAE is designed to evaluate and enhance professionalism in nursing. It ensures high-quality, ethical, and patient-centered care by equipping nursing professionals with essential knowledge, skills, and principles. The syllabus ...Guidelines for GPPAE Attendees
The Global Professional Proficiency Assessment Exam (GPPAE) is a critical step in evaluating your readiness for advanced roles in healthcare. To help you succeed, here are detailed guidelines designed specifically for attendees of the exam. Purpose ...